In today’s video, I’m talking about the importance of alt text in your Webflow website, as well as how you can create a process and delegate that to your team to ease up time and get an optimized website that Google would love to index. Let’s dive in.
So essentially, alt text or alt descriptions are written copy that’s there in place of an image on a web page. So if Google was scraping a page, or if a page wasn’t loading properly, this text helps bring your written tools to describe images to visually-impaired readers and allows certain search engines to better crawl and rank your website.
So think of every image as a piece of code that is given a specific title. And that title can help Google index that page better by you providing that content. So I’m going to show you a couple of examples before we jump straight into the training.

So you can see this image here looks like a background over at Hubspot. So, a bad alt text would be, “Hubspot office wall Singapore inbound marketing workplace murals orange walls...” right? Just random words.
Now, a good alt text would be, “Orange mural that says ‘ship it’ on a wall at Hubspot’s Singapore office”. So this clearly defines what’s on that page and can actually provide detail and specificity in regards to that.
So here’s another example of a lady on the computer, and someone else pointing at it. Now, bad alt text for that would be, “Woman pointing to a person’s computer screen” right? Pretty vague.
Now, a more specific alt text would be, “Business school professor pointing to a student’s computer screen”. That’s a really visual text that can really help in regards to describing something specific in that example. So, if you’re doing a web page for an education software or something to that effect, this would be a good image that Google can index to help people find what they’re looking for.

So, to jump into the training, just some of the best practices:
And then, use the keyword once, or a semantic variation. What that means is, if the keyword is “How to generate leads,” you can use a variation, like “lead gen” or “lead generation”. So it’s still in tune with that keyword, but it’s not exact verbatim.
Because sometimes when you keyword stuff a little bit, Google knows what you’re trying to do, and won’t index you where you wanna be.
So, step one: what we’re gonna do is add alt text to all of our specific projects. And this is how we’re gonna do it moving forward in a new project we have.
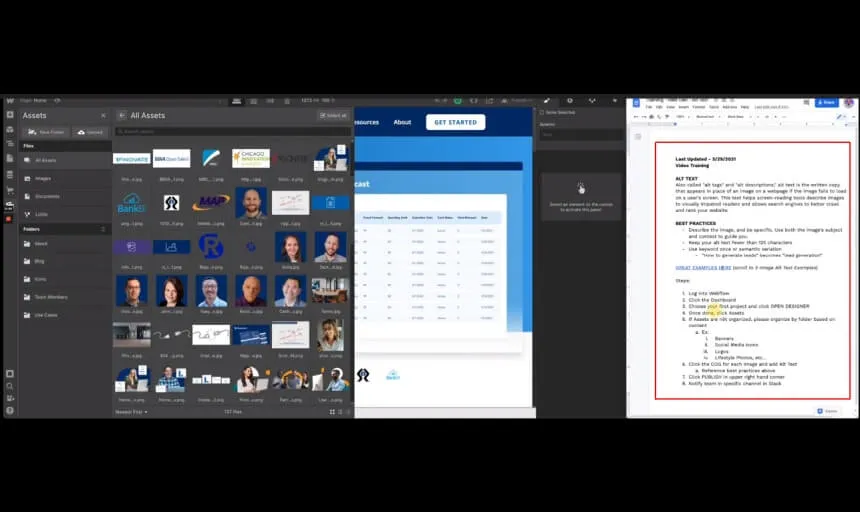
So, just hit up Webflow, go ahead and log in. Click the Dashboard, and then choose your first project—we’ll just choose one as an example right here. And then you’re just gonna hit Open Designer.
Now, we click Open Designer, you’re going to click Assets once this page loads up. So, in the left hand side right here, you’ll see a little image button, and you’ll see all the images on the site. You can actually expand this by pushing this button here, that’ll expand all the content properly—and we already have photos here, so that’s fine.
So if assets are not organized, make sure you organize them in a folder, based on content, right? So here, we have About, we have Blog, we have Icons, we have Team Members, we have Use Cases. So some of these are organized, and you can probably organize the rest of it—well, feel free to do that before we jump into changing the alt text.
Then, once that’s done, we’re just gonna hit All Assets, and you’re gonna start all the way to the bottom, here in this corner. And then you’re gonna start to title these appropriately.

So here’s the first image. You’re just gonna hit Settings, and then you’re gonna hit Descriptive, right? Now here, we’re gonna add all the asset details.
So for the alt text, this one is—Let’s take a look at it—looks like a woman at her computer, doing some work, right? Let’s actually look at it here. So it looks like she’s at her desk, doing some paperwork, “400,000 in savings”, that’s like an image overlay.
So let’s go ahead and be as descriptive as we can. So, we’ll put, “A young woman, sitting at her desk, looking at paperwork and smiling”, okay? And then we’re just gonna click off, and that’s it.
So you’re gonna do that same practice for all the images. Once that’s done, just make sure that you click in the upper right hand corner, choose Publish to Selected Domains, and then just notify the team via Slack that you’ve made that update.
So go through each site, make sure everything is optimized and ready to go—for most sites, hit Done. Just wanna make sure we’re double checking that to make sure everything looks good. And then, just make sure to Publish when you’ve completed.
The best source of information for customer services, sales tips, guides and industry best practices. Join us.
Not quite ready to schedule a call? Explore our free resources designed to help you elevate your digital presence. Simply enter your name and email to gain access to these valuable tools:

Present your educational initiatives with clarity and impact using our comprehensive Pitch Deck Template. This resource includes all the essential slides needed to captivate stakeholders and effectively communicate your vision.

Ensure a smooth and successful website launch with our detailed checklist. This essential guide walks you through every critical step, from pre-launch preparations to post-launch optimizations, tailored specifically for educational institutions.

Enhance your institution's online presence with our Optimization Guide. This resource provides actionable strategies and best practices to improve user engagement, streamline navigation, and drive results on your website's homepage.

Schedule a free call to explore how we can help you transform your brand and website.